Admin Control Panel

New Post | Edit Pages | Change Layout | Stats | Sign Out
Showing posts with label Tutorials. Show all posts

Monday, March 3, 2014

Tutorial for Hero Arts - Ink Daubers + Project Life

Hi everyone! I'm over on the Hero Arts blog today, sharing a Project Life layout I did of my daughter's 6th birthday party. She had a spa day - pretty fancy, no? I found an amazing deal on Groupon for this local company called Jola's Joyful Events, they come into your home and set up the spa party. They do EVERYTHING!! It was so cute! Courtney had a blast with her friends, being pampered. Although I usually do my Project Life layouts weekly, for events like this (aka times when I take way too many photos!) I go ahead and dedicate it's own special two page spread to the event. Afterall, it's not everyday that my baby turns six! True story - when I was making this layout, I put "5" everywhere, including that big cutout "6" in the title block!! I had to pull it apart and fix it. This mama is in denial that her baby is six!! LOL!


Over on the Hero Arts blog, I shared a tutorial on how I made the journaling cards using ink daubers and a sheet of wax paper. Check it out!


I had lots of fun creating this layout. I definitely have the scrapbooking bug again, which is what got me into paper crafting in the first place. Yay!

Thanks for stopping by,

Monday, November 18, 2013

Tutorial for Hero Arts - using gesso with stencils!

I'm over on the Hero Arts blog today, sharing this card that was inspired by Candy Canes!


I had fun using gesso with my Tweed Pattern stencil. I put together a little video to show how it's done!


Thanks for stopping by!

Saturday, November 16, 2013

My Video Setup

I recently created a new setup in my craft room for filming videos - I broke it in with this one that I created for the Hero Arts blog. I couple people have asked about my setup, and I meant to post it already (Hi, Lisa!) so I thought I'd finally make good on that promise. I had some old existing Elfa shelving (from The Container Store) in one little area of my room. It's a bit disorganized, but here it is:


My friend Mary Dawn recommended this mounting bracket, and it's absolutely perfect for my setup. And it's CHEAP! Less than $7 on Amazon...


It has a little X-clamp thingie that pinches over the metal slats on my shelving perfectly.


Then I just screw on my video camera (I use our Panasonic digital camcorder - we bought it for filming family events but it doubles as a hobby tool!) to get the perfect top-down angle for my videos.


Not sure this would work for everyone, but I love it! After I film a tutorial, I import it onto my laptop (PC) and use Windows Movie Maker to edit - it's free, yay, and I can add photos, music, crop out portions, etc. It's relatively easy to use. Then I upload to YouTube when I'm done!

Not that I'm a video tutorial expert, but that's what I do. :-)

Thanks for stopping by,

Tuesday, November 12, 2013

Paper Mosaic Tutorial on Splitcoaststampers!

In case you missed it - I was on Splitcoaststampers with my Paper Mosaic Tutorial last month! Yay!!


I used my Hero Arts Circle Ornament Tree, adding sequins for the ornaments! Fun! You can find the full tutorial to create the mosaic on Splitcoaststampers right here.

My tutorial was a bit lost in the shuffle of the stamping madness of their awesome Hope You Can Cling To event - only one person played along so far. I would soooo love it if you gave it a try - make a card and post it to Splitcoast!

Thanks for stopping by,

Thursday, November 7, 2013

Bokeh Stamping Tutorial

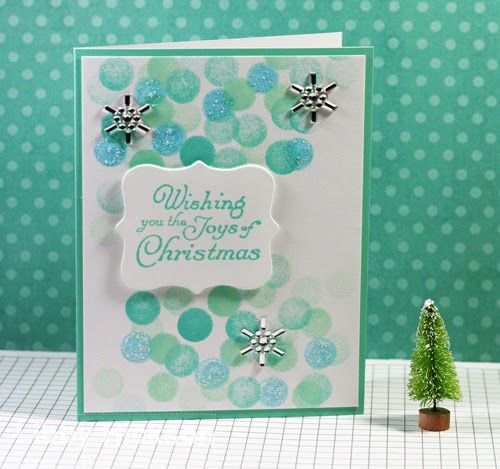
This is an "in case you missed" it post! I was on the Hero Arts blog last week, woohoo! I made this card...


I've noticed this "bokeh" stamping technique around blogland and in magazines recently, so I wanted to give it a try myself! It was super quick and easy using Hero Arts ink daubers and also sponge daubers and ink (Tide Pool & Mint Julep)! I made a little tutorial if you'd like to have a looksie.


Thanks for stopping by!

Tuesday, February 26, 2013

Suzi Blu + my light box

Today I'm sharing a card I made using an adorable image from Suzi Blu! I am such a massive Suzi Blu fan!!


I used the No-Line Coloring technique to color this Spirit Girl image. She was water colored with Distress Ink, using my kraft sheet as a palette.


I wanted to watercolor to play along with the Mix-Ability challenge over on Splitcoaststampers. They are posting mixed media challenges every Friday now! Yay!! Moving color with water is Challenge #4.


I just love how this technique looks. Here's my how-to video that was on the Hero Arts blog last summer. :-)


Thanks for stopping by,

Friday, February 22, 2013

Mosaics, Seahorses, Sequins + a giveaway!

On Wednesday I shared a tutorial on the Hero Arts blog, featuring a technique for paper mosaics. Today I'm sharing another little mosaic card I made from the same batch of paper.


In the video I mentioned that the colors reminded me of the beach and aquariums, so I decided to pair a mosaic background with the seahorse from the Hero Arts Sea Life set. The message is from the Hero Arts + Studio Calico set Darling Sentiments. I thought the seahorse needed a bit of Stickles shimmer. I also played with some super fun sequins I picked up from Neat & Tangled. The "Mermaid's Tail" color goes perfectly with the Hero Arts Pool papers!


Here's my mosaic video, if you'd like to take a look. :-)


And finally, a little giveaway! In the tutorial, I used the Heart Frame die set. It turns out I have two sets! One for me - and maybe one for you!? Just leave me a comment, and I'll draw a winner next Wednesday.

Thanks for stopping by,


PS... Please ignore my boo boo on this card. Gah!

Monday, August 6, 2012

In case you missed it - No-Line Coloring Tutorial!

During my blogging break for the summer I shared a video tutorial for "no-line coloring" over on the Hero Arts blog. Did you catch it over there? I thought I'd reshare it here today, just in case you missed it. I made a fun card with the Big Eyes owl.

And here's my video!! I am not a video-making-expert so it's still a slow and painful process for me, LOL! But I hope you like it.


You can find the instructions for the card on the Hero Arts site here as well.

Thanks for stopping by!


Friday, February 4, 2011

From Courtney's Closet - and a tutu tutorial!

Today is a very special day in our house - my girl is turning three! As some of you know, I used to make cards every week inspired by Courtney's cute baby clothes. I had so much fun with those cards, and I've missed making them. Now that I'm stamping somewhat regularly again, it's time for a return of From Courtney's Closet! And I figured, what better day is there to do it then my sweet baby girl's birthday?? So here's today's card...


...which was inspired by this sweet photo of my little ballerina...


Courtney looooooves tutus! She wears one every single day. Truly. She started taking dance classes in the fall and gets so excited every week when she gets to go. The result is that her mama has become slightly obsessed with buying ballerina stamps!! I have quite a collection going. And this precious image from MFT's Ballet Recital Jolinne is one of my absolute favorites. In the photo of Courtney, she's wearing a tulle tutu I made for her - so of course I had to make a little tulle tutu for the card, too! :-)


I played along with the latest MFT WSC sketch challenge, it worked perfectly for this card!


And now, I thought you might like to learn how to make a tutu for your own little ballerina! It's sooo easy to do!

1. Gather your supplies. You'll need ribbon, ~4-5 yards of tulle, scissors and a measuring tape. The amount of tulle just depends on how full you want your tutu. Cut your tulle into strips 4" wide. The easiest way to do this is to roll up the tulle & then cut.


2. Measure around your little ballerina's waist, and use that measurement to tie knots in your ribbon, leaving tails of ribbon beyond the knots for tying. The tulle will be tied between your two knots.


3. Tie the tulle to the ribbon using the loop method - make a loop and then bring the tails of the tulle up through the loop. Pull to tighten.


4. Continue in this method to fill up your ribbon, making the tutu as full as you'd like. Here I used two different colors of tulle. After I finished with the tulle, I also added some strips of ribbon in the same manner.


5. Voila! My finished tutu! :-)


If you make a tutu, or a tutu-inspired card, leave me a link so I can check it out - I'd love to see!

And I have to tell you, I just got the BEST compliment on my ballerina card. Courtney came over here and saw it and said in her sweet little 3 yr old voice, "Mommy can I have that ballerina card? It's amaaaazing!" Yay, the very best approval. :-)

Have a wonderful weekend!


  • Stamps: Ballet Recital Jolinne and Happy Thoughts from MFT
  • Paper: SU Pink Pirouette, Hobby Lobby hot pink dots, Memory Box light pink dots, GP white
  • Ink: Memento Tuxedo Black, Copic markers
  • Accessories: Cuttlebug Swiss Dots , tulle, pearls, Stickles, velvet ribbon, PTI scallop edge die, straight pin

Tutorials

Get Inspired

 
Pin It button on image hover